Today our Elvis has left the building! I just got an email with a proof of delivery that the messenger service has picked up our Surface table and is expected to deliver it to the Sheraton hotel in Stockholm later tonight. Tomorrow is the first day of Cornerstones conference Developer Summit and Connecta will be in the exhibition together with Microsoft and our Surface table. To this event three of our developers have worked really hard to finish a first version of an application used to present Connecta. I have been promised the final bits on email later today!
On the table we also have the latest applications from Microsoft, including the three games released last week and the Mobile Connect Sample Application. The later not yet installed but based on the previous installation experiences, it should be no problem. The four games are Chess, Checkers, Tiles and Ribbons.
The Microsoft Surface Mobile Connect sample application connects a Bluetooth-enabled mobile phone to a Microsoft Surface unit to enable users to interact with data and contacts on their phone. To be able to use the application you have to have an application installed on your phone and you have to have a Bluetooth stack from Microsoft.
So if you are at Developer Summit 2009, come by the Microsoft booth, say hi and touch the Surface!
tisdag 14 april 2009
onsdag 1 april 2009
iBar from Mindstrom
Today I tried the iBar from Mindstrom. They say that it is the first commercially available multi-touch, interactive, customisable bar in the world and, as far as I know has similar setup as Microsoft Surface. The form factor is different and that’s what makes the product really interesting but Surface seems way ahead when it comes to the technology side. Microsoft Surface feels more robust and has better 360-degree capabilities. In the demos I saw and tried there was no notion of orientation on the things placed on the bar.
The iBar is about four feet (120 cm) high and maybe seven feet (210 cm) wide but you can connect several iBars together.
We have talked about building some sort of podium for our Surface to be able to work at it standing. Today’s demo of the iBar convinced me even more. It is really hard to sit at a Surface-table for a longer period of time since you don’t really have a comfortable way of sitting around it. There is no where to place your legs.
I’m really looking forward to see what other form factors Microsoft are planning for coming versions of Surface!
måndag 16 mars 2009
The table is here!
Finally the table is in our hands. It was some time ago that the table arrived but I haven’t had time to write anything about it so far. The table was delivered by UPS and they deliver thru the first door of the house. After that it is you own responsibility to move it to the desired location. There is a Site Readiness Guide and I really recommend reading it carefully, specially the parts about Surface Dimensions and Weight. The shipping crate that the unit comes in is huge! I had just assumed that it would arrive on a pallet of standard size but the pallet was wider and didn’t go thru the door. So I had to unpack the Surface unit outside our office and carry it with bare hands. Well not alone since the table weights almost 90 kg.
Our setup consists of a wall mounted flat screen monitor as a primary display and a Logitech DiNovo Edge Bluetooth keyboard with integrated touchpad for input. I have also set up Live Mesh to simplify deployment of applications that don’t need an installer but more on that on another post.
Setting up the table was really easy thanks to the great video on the community site where Greg Swanson and David Nichols unpacks and installs a unit. The video can be found under Training Videos in the downloads-section and is named “Installing a Surface Unit”. When you have placed an order, make sure to ask for access to the Surface community via the Surface Business Desk!
At first I was struggling a bit to be able to set up the primary and secondary monitors correctly. I tried to use my normal plug-in-an-external-monitor-to-Windows-Vista-skills but didn’t realize that there is a shortcut to an application to set up the monitors on the desktop. With that in hand the set up was really easy.

After setting up the monitors, the administrators account, installing antivirus and hooking the unit to our domain it was time to start the Surface Shell. Excited to try our own unit for the first time I forgot to start Surface Input with the result that nothing happened when interacting with the Surface. Then I remembered Dr. Neil saying “There is nothing wrong with the table. Just start Surface Input first.” Surface Input is started by a shortcut on the desktop and starts an application that activates the cameras and makes the unit ready for input.
The last two days the unit has been placed in the reception during some events that we have had with customers and the response is massive. People love it! One thing that I have noticed is that it is really interesting to observe new users from a distance. See what they do and how they try to interact with the applications. A lot try to double click and if they don’t receive feedback on interaction right away they start to touch all over the place. One of our developers has built an application that reads image libraries from our Intranet based on SharePoint. It uses the classic folder metaphor and when a user sees a folder they have to double click! But in this application one click on a folder loads the pictures and the next click on the same folder hides the pictures. So by observing users you can learn a lot! This is of course nothing new but became really obvious when they are not only interacting with a new application but also with a new type of interface.
Now the unit is going back to the developer cave again and that feels good. It is impossible to sit in a public area and develop and test applications.
onsdag 25 februari 2009
Interviewed on MSDN Radio.
I have been interviewed on Swedish MSDN Radio! Last week Dag König, who is a Product Technology Specialist at Microsoft Sweden, talked to me about out Surface in general, Surface development and out plans with Surface at Connecta. The interview is in Swedish and is entitled “We put all the cards on the table with Microsoft Surface.” The show is over an hour and the Surface-stuff starts at about 27 minutes into the show and last for 20 minutes.
The interview
The interview
Surface training

When me and Jouni were at the Surface training in Munich Jouni wrote an application that uses the raw images from the cameras. The table consists of five cameras, four cameras that take pictures of the corners and one that takes a picture in the center. Then there is a process that goes from the raw images to a binary version of the image with each pixel either black or white for faster processing. The screen is divided into a grid containing one-inch squares. The next step is to place each frames contact data into shared memory and tell the SDK that data is available and ready to use.
The fact that cameras are used and not just a touch screen is what makes Microsoft Surface so special. Things that happen on the surface are recognized and even things that happen above the surface are noticed. About one inch above things starts to happen.
 The course that we attended took place at one of Microsoft’s Technology Centers (MTC). There are three MTC in Europe, Dublin, Paris and Munich. On these centers Microsoft have three types of offerings, Strategy Briefing, Architecture Design Session and Proof of Concept Workshop. The center was really great even if the lunch was a logistical challenge. You can read more about the centers here: http://www.microsoft.com/mtc/default.mspx
 I had to try Jounis application and the quality of the images that you get from the cameras with my face. "Thank god they can be cleaned was Dr Niels diagnosis."
The resulting image
 Jouni in action
måndag 23 februari 2009
Love at first sight (at least attraction)
A very important new concept with Microsoft Surface is "Attract applications". These types of applications are screen-saver like, and are designed to entice people to the table. A good (and by all means fun) attract application should welcome people to touch and use the Surface table.
Water
The standard attract application that is shipped with Surface is called “Water”. Water might seem a a bit laggy when it’s run through the simulator, but on the table itself it’s beautiful and runs smoothly. The Water application can be customized a tad by using the Water configuration tool that comes with the Surface SDK.
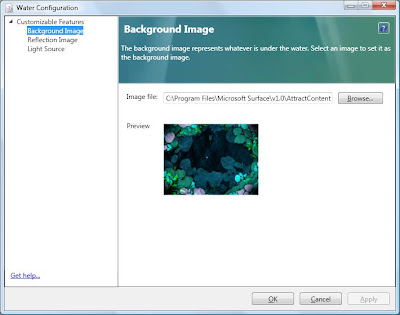
Water Configuration Tool
Custom attract applications
It's pretty challenging to create your own attract applications with the Microsoft Surface Interaction Design Guidelines in mind. However, if you go for it strive for an application with very high interactivity and 360 degrees usability. You have to be able to entice people from all sides of the table - and keeping them there. To create a custom attract application, follow these steps:
1. Develop a Surface application.
2. Modify the application’s description file. (This XML file most likely has the same title as your project, at least if you’ve created the project by using the Visual Studio templates that comes with the Surface SDK). Change the file to look something like this:
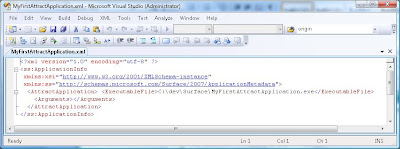
Description file for an attract application. (Note: “ExcecutableFile” is the path to your build Surface application).
Another option is to just comment out the"application" section in the description XML file and un-comment the "attractapplication" section.
3. Deploy the XML file to "%ProgramData%\Microsoft\Surface\Programs". %ProgramData% is a pre-defined path.
4. The next step involves creating a registry key, so if you’re not familiar with handling the Windows registry make sure you create a back-up of the registry before moving on.
5. Add the following registry key "HKEY_LOCAL_MACHINE\SOFTWARE\Microsoft\Surface\v1.0\AttractMode"
6. Create a new String value to the key AttractMode (from step 5), and call it "CurrentAttractApplication". Set the value to your new attract application’s xml file name, without the file extension. I.e. the above “MyFirstAttractApplication.exe” would be the value “MyFirstAttractApplication”.
When you restart the Surface shell or Surface simulator your new attract application should load right way. Don’t worry if it doesn’t. If the registry key points to the wrong file, or you're having any other hard-to-guess error, the default application is loaded (normally “Water”).
Note: The Surface SDK tells you to “Open the registry and navigate to the HKEY_LOCAL_MACHINE\SOFTWARE\Microsoft\Surface\v1.0\ModeProfiles\Xxxx\AttractMode key (where Xxxx is the appropriate mode profile).” I can't get this to work, and also Dr. Neil talked about this at the Surface training I attended. Below you got an example of the suggested SDK (wrong) way, and one that works.
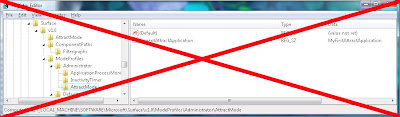
Doesn't work

Works
Water
The standard attract application that is shipped with Surface is called “Water”. Water might seem a a bit laggy when it’s run through the simulator, but on the table itself it’s beautiful and runs smoothly. The Water application can be customized a tad by using the Water configuration tool that comes with the Surface SDK.

Water Configuration Tool
Custom attract applications
It's pretty challenging to create your own attract applications with the Microsoft Surface Interaction Design Guidelines in mind. However, if you go for it strive for an application with very high interactivity and 360 degrees usability. You have to be able to entice people from all sides of the table - and keeping them there. To create a custom attract application, follow these steps:
1. Develop a Surface application.
2. Modify the application’s description file. (This XML file most likely has the same title as your project, at least if you’ve created the project by using the Visual Studio templates that comes with the Surface SDK). Change the file to look something like this:

Description file for an attract application. (Note: “ExcecutableFile” is the path to your build Surface application).
Another option is to just comment out the
3. Deploy the XML file to "%ProgramData%\Microsoft\Surface\Programs". %ProgramData% is a pre-defined path.
4. The next step involves creating a registry key, so if you’re not familiar with handling the Windows registry make sure you create a back-up of the registry before moving on.
5. Add the following registry key "HKEY_LOCAL_MACHINE\SOFTWARE\Microsoft\Surface\v1.0\AttractMode"
6. Create a new String value to the key AttractMode (from step 5), and call it "CurrentAttractApplication". Set the value to your new attract application’s xml file name, without the file extension. I.e. the above “MyFirstAttractApplication.exe” would be the value “MyFirstAttractApplication”.
When you restart the Surface shell or Surface simulator your new attract application should load right way. Don’t worry if it doesn’t. If the registry key points to the wrong file, or you're having any other hard-to-guess error, the default application is loaded (normally “Water”).
Note: The Surface SDK tells you to “Open the registry and navigate to the HKEY_LOCAL_MACHINE\SOFTWARE\Microsoft\Surface\v1.0\ModeProfiles\Xxxx\AttractMode key (where Xxxx is the appropriate mode profile).” I can't get this to work, and also Dr. Neil talked about this at the Surface training I attended. Below you got an example of the suggested SDK (wrong) way, and one that works.

Doesn't work

Works
tisdag 17 februari 2009
Surface training
On Wednesday last week, me and Jouni (the other writer on this blog) went to Munich in Germany to attend one of the first Surface developer courses outside of Redmond. Teacher was Dr Neil Roodyn from Australia. Dr Neil has been working with the Surface team for almost a year, developing applications and giving training. This was one of three occasions in Europe.

Dr. Neil Roodyn
The course was titled Building Applications for Microsoft Surface and lasted two days. We were 16 attendees and had two lovely Surface tables at our disposal.
Dr Neil talked a lot about the Surface vision and the history about the table, how it all started and how it came to be what it is today. The work with the Surface table started back in 2001 and in 2005 it got the current look and feel. In 2007 the first public pictures appeared and at PDC in 2008 it was made available to the public. If it took Microsoft seven years to get Surface to the public I can’t help thinking about what kind of projects they are starting right now that we will se more of in 2015!
It is really important to think of Microsoft Surface as something else then just a big touch enabled screen. Cause if touch is all that you are looking for then there are much cheaper solutions! Now the unique thing with Microsoft Surface is the interaction with what happens on and above the surface of the Surface.
Thanks to the vision recognition system Surface is able to detect things on top of the actual surface. About an inch from the surface things are starting to get picked up by the cameras. This information for instance used to detect fingers and the orientation of the finger.
As usual when you attend a course and have some knowledge of the subject, the first hours or the first day is not really challenging. Although Dr Neil managed to keep my interest and soon we got to start writing code and play with the tables.
One interesting thing to see on the table compared to the simulator is when you have recognized a tagged object and move it fast over the surface. The vision recognition system is not able to track that it is a tagged object that moves and it becomes a blob instead. But when you stop moving it is recognized as a tag again and the TagVisualizer is animated to the new spot. On the simulator you can move a tagged object with a TagVisualizer at any speed with no problem.
One part of the course was focused on unpacking, configuring and setting up the table. This part was really good since we haven’t gotten our table yet. It was also great to talk to Dr Neil about different deployment and development environment strategies. He had some interesting thoughts about how to use Live Mesh with Surface that I will try.
Anyway a really great course but I would have enjoyed more time coding and hands-on Surface-time!
Prenumerera på:
Inlägg (Atom)


