söndag 20 december 2009

ISurfaceScrollInfo and you, Part Three.

Hi again. Last time I talked about the IScrollInfo interface and how it is implemented in my SurfacePagePanel. Now it’s the time to talk about the ISurfaceScrollInfo! As I said in the last post ISurfaceScrollInfo extends the IScrollInfo interface. ISurfaceScrollInfo has the extra capabilities to react on two basic NUI (Natural User Interface) gestures associated with the Microsoft Surface: Panning and Flicking. Both Panning and Flicking are common NUI gestures but I believe Panning is the most common and natural thing to do.

So what is Panning and Flicking? If you are not interested in reading my explanation you can skip this section! But Panning and Flicking is like moving and object, say an apple. Panning is equivalent to pick up the apple and placing it back gently on another spot, the movement begins when you pick it up and stops when you place it back down again. You as a user are control of it’s movements. Flicking is more like throwing the apple. You are directly not in control of it’s movement. It’s the same with flicking. The moment you release your contact from the Microsoft Surface, the virtual physics kicks in and scrolls the items list until it stops.

ISurfaceScrollInfo extends with three new methods, which helps you control the scrolling when Panning and Flicking:

  • ConvertFromViewportUnits(origin, offset) : vector - Converts horizontal and vertical offsets, in viewport units, to device-independent units that are relative to the given origin in viewport units.
  • ConvertToViewportUnits(origin, offset) : vector - Converts horizontal and vertical offsets to viewport units, given an offset in device-independent units that are relative to the given origin in viewport units.
  • ConvertToViewportUnitsForFlick(origin, offset) : vector - Converts horizontal and vertical offsets to viewport units, given an offset in device-independent units that are relative to the given origin in viewport units.

I’ve inserted the actual documentation summery from the MSDN for each method. What can also be read in the documentation is that the results from the convert to methods are later used when setting the vertical and horizontal offset (using the SetHorizontalOffset and SetVerticalOffset methods from IScrollInfo interface). To be more precise, ConvertToViewportUnits is called all the time during panning and ConvertToViewportUnitsForFlick is called once the panning is complete if needed. The documentation isn’t that clear on when ConvertFromViewportUnits is called by the framework, but it is suppose to reverse the conversion done by the convert to methods.

So how are these methods implemented in SurfacePagePanel? The standard implementation should be to just return the offset argument, as it is done in the Continuous Planning List. But in my case I want to control the panning and flicking. Unlike how the iPhone and Android based phones UI works, I want to constraint the panning movement. The constraint is keeping the currently focused page in the center but you should also be are able to peek at the next item at each side of the page. This constraint I have in the ConvertToViewportUnits method:

  236 public Vector ConvertToViewportUnits(Point origin, Vector offset)

  237 {

  238     if (_isMoving || !_panningOrigin.HasValue)

  239     {

  240         return new Vector(0.0, 0.0);

  241     }

  242 

  243     var absOffset = Math.Abs(GetScrollOwnerElasticityLength());

  244     var direction = offset.X / absOffset;

  245     const int scaleFactor = 4; // trail and error generated factor for better user experience.

  246     var offsetChoice = Math.Min(absOffset, Math.Log10(absOffset) * scaleFactor);

  247 

  248     return new Vector(offsetChoice * direction, offset.Y);

  249 }

The important code here is that I’m using the logarithmic calculations to keep the constraint as it caps horizontal offset. This is an example how you can alter the panning.

If we continue with ConvertToViewportUnitsForFlick you will see that it is not as exciting as ConvertToViewportUnits :

  278 public Vector ConvertToViewportUnitsForFlick(Point origin, Vector offset)

  279 {

  280     _hasFlicked = true;

  281     return new Vector(0.0, 0.0);

  282 }

Here I return an empty vector and there is a reason for it, because it prevents the ScrollViewer to continue scrolling when flicking. I use flicking as one of the methods to indicate to switch page, so I need to control the scrolling myself. In my next and last post of this blog series I will talk about how I finalized my SurfacePagePanel.

Oh, by the way. Remember that the arguments to ConvertToViewportUnitsForFlick are based on the result from ConvertToViewportUnits. In my solution I got a nasty little side effect. The offset argument to ConvertToViewportUnitsForFlick can be used to determine the direction of the flick, but due to my calculation in ConvertToViewportUnits the flick direction was occasionally reversed. Meaning when the user flick to the left, the offset indicates right. I can’t explain why and how it occasionally was reversed, but it did happen.

So what did I do the implementation of ConvertFromViewportUnits? Well, I  used the standard implementation and returned the offset argument. As I don’t see any negative side effects in doing that I leave it with that. Secondly I not really sure how I should properly implement it in my case. If you know more about ConvertFromViewportUnits and want to share it with me, feel free to send me an email explaining it! To prevent any spam mails, my email is: first name dot surname at Connecta dot se. My first name and surname is shown as the author of this post.

With this, I have gone through the methods in ISurfaceScrollInfo interface. But I feel like writing another blog post to wrap things up with my SurfacePagePanel. But this post marks the ending of implementing ISurfaceScrollInfo. Stay tuned to the epilogue of ISurfaceScrollInfo and You series.

onsdag 2 december 2009

ISurfaceScrollInfo and you, Part Two.

It’s been a while since I wrote the last post, but blame on the flu. But now I have the energy to continue this “blog series”.

In the last post I talked about how to generally create a custom panel in WPF and I also showed how I implemented MeasureOverride and ArrangeOverride for our SurfacePagePanel. Now I will continue this blog series with a part of the ISurfaceScrollInfo interface. I will actually start with looking at the IScrollInfo, which ISurfaceScrollInfo extends from.

Before diving into the IScrollInfo interface I will post a few reference links which have helped me. Read the reference links because there’s a lot of information there:

IScrollInfo, when implemented, tells a ScrollViewer how a particular panel is scrolled. If a panel doesn’t implement IScrollInfo the ScrollViewer will scroll the panel according to some default behavior. Before jumping in how to implement IScrollInfo I want to explain a couple of concepts you need to understand:

  • Viewport
  • Extent

Viewport is the area of the panel that is visible to the user. Looking at figure 1 the Viewport represents the red solid rectangle. For instance, in our case the SurfacePagePanel is suppose to reside within a SurfaceListBox. The SurfaceListBox controls how much we are able to see of it items and thus it’s size will implicitly be our Viewport.

The Extent on the other hand is the total area all measured items and it’s seen as the dotted rectangle in figure 1. If we once again look at our case, arranging 10 items horizontally where each item is 300 pixels wide and 300 pixels in height will give us an Extent which is 3000 pixels wide (10 items times 300 pixels) and 300 pixels in height. In other words, the Extent is the total area needed to display all items at once.

viewport_extent2figure 1: Viewport (red rectangle) and Extent (dotted rectangle).
The gray rectangles represents items.

If we continue looking at the members of the IScrollInfo interface we see there’s a lot of them. However, many of the members are scrolling methods (methods which are called for certain user actions):

  • MouseWheelUp()
  • LineUp()
  • PageUp()
  • Etc…

Considering a Surface context these methods are not that important (mainly because you need a mouse and keyboard to access these methods) so these methods doesn’t have an implementation.

Moving on to the IScrollInfo members that composes the real scrolling logic:

  • ViewportWidth – The width of the Viewport
  • ViewportHeight – The height of the Viewport
  • ExtentWidth – The width of the Extent
  • ExtentHeight – The height of the Extent
  • VerticalOffset – How much the Viewport is offset vertically according to the upper right corner of the Extent
  • HorizontalOffset – How much the Viewport is offset horizontally to the upper right corner of the Extent
  • SetVerticalOffset – Sets the Viewports vertical offset
  • SetHorizontalOffset – Sets the Viewports horizontal offset
  • CanVerticalScroll – Whether the panel can scroll it’s content vertically
  • CanHorizontalScroll – Whether the panel can scroll it’s content horizontally
  • MakeVisible – Scrolls a specific item (specified as a Visual) to a desired location (specified as a rectangle).

Now, let’s go through how these methods are implemented in the SurfacePagePanel. As you might imagine, the Viewport and Extent is calculated during the measuring pass:

152 protected override Size MeasureOverride(Size availableSize)

153 {

154 var resultSize = new Size(0, 0);

155 var extent = new Size(0, 0);

156

157 foreach (UIElement child in Children)

158 {

159 child.Measure(availableSize);

160 resultSize.Width = Math.Max(resultSize.Width,

161 child.DesiredSize.Width);

162 resultSize.Height = Math.Max(resultSize.Height,

163 child.DesiredSize.Height);

164 extent.Width += child.DesiredSize.Width;

165 }

166

167 resultSize.Width = double.IsPositiveInfinity(availableSize.Width)

168 ? resultSize.Width : availableSize.Width;

169 resultSize.Height = double.IsPositiveInfinity(availableSize.Height)

170 ? resultSize.Height : availableSize.Height;

171 extent.Height = resultSize.Height;

172

173 if ((_viewport != resultSize _extent != extent)

174 && ScrollOwner != null)

175 {

176 _viewport = resultSize;

177 _extent = extent;

178

179 ScrollOwner.InvalidateScrollInfo();

180 }

181

182 return resultSize;

183 }

Code 1: Viewport and Extent calculated in MeasureOverride.

I hope you can read the code, but there isn’t much space with this blogspot theme. But if you can read it, the Viewport is simply the availableSize given to us (or the size of the largest child element in case of infinitive availabeSize). The Extent, on the other hand, is actually calculated. Extent’s width is the sum of all the child elements measured width (row 164) and the height is simply the height of the resultSize (row 171) which indirectly is the height of the Viewport (row 176).

When both the Viewport and the Extent is calculated ViewportWidth, ViewportHeight, ExtentWidth and ExtentHeight are easily implemented as they just return the value of the corresponding properties of Viewport and Extent.

As our SurfacePagePanel only can scroll horizontally CanVerticalScroll is set to false, VerticalOffset always returns 0 and SetVerticalScroll is not implemented. Aa a side note: at first I threw a NotImplementedException from the SetVerticalScroll method but the fact is SetVerticalScroll is called at least once by ScrollViewer. So don’t go throwing NotImplementedException everywhere because you never know if or when it hits you in the face.

Let’s look at the corresponding properties and methods for the horizontal behavior. As you might’ve expected it’s the SetHorizontalOffset that controls the position of the Viewport. To control the Viewport offset a translation transform is used as the panels RenderTransform. Changing the translation transform also changes what is seen through the Viewport. As seen in the code below, SetHoriztonalOffset validates the input and calls the SetViewport method, which is a general method for setting the Viewport.

501 public void SetHorizontalOffset(double offset)

502 {

503 if (!CanHorizontallyScroll)

504 {

505 return;

506 }

507

508 if (offset == _viewportOffset.X)

509 {

510 return;

511 }

512

513 SetViewport(offset, _viewportOffset.Y);

514 }

Code 2: Implementation of SerHorizontalOffset.

578 private void SetViewport(double newHorizontalOffset,

579 double newVerticalOffset)

580 {

581 //Cap the offset values.

582 newHorizontalOffset = Math.Max(0,

583 Math.Min(newHorizontalOffset,

584 ExtentWidth - ViewportWidth));

585 newVerticalOffset = Math.Max(0,

586 Math.Min(newVerticalOffset,

587 ExtentHeight - ViewportHeight));

588

589 _viewportOffset = new Point(newHorizontalOffset, newVerticalOffset);

590 _renderTransform.X = -_viewportOffset.X;

591 _renderTransform.Y = -_viewportOffset.Y;

592

593 if (ScrollOwner != null)

594 {

595 ScrollOwner.InvalidateScrollInfo();

596 }

597 }

Code 3: Implementation of SetViewport.

Seen in the code for SetViewport the ScrollOwner is notified about the changes by calling InvalidateScrollInfo. This is important to keep the ScrollViewer in sync with the panels scrolling data.

To summarize this post we talked about the Viewport and Extent and their roll in scrolling a panels content. I also showed the code for how the scrolling, or the placement of the Viewport, is implemented in the SurfacePagePanel using translate transforming.

Next post will be about the ISurfaceScrollInfo, I promise!

torsdag 12 november 2009

Helping Hands

The last two months I have been working with a team at Ergonomidesign to create a new Surface Application. It is called Helping Hands and envisions the future of integrated health care. How do you, as a potential patient, prevent your lifestyle from becoming an illness? How can you recognize and prevent e.g. Coronary Artery Disease, before it is too late? Welcome to have a look at the future of patient management and treatment in 2015.

The application will exhibit at the world’s largest medical trade fair, Medica/Compamed in Germany next week and by then we will be able to say and show a lot more of the application.

The team creating Helping Hands consists of graphical designers, interaction designers and developers from Ergonomidesign and developers and architects from Connecta.

Right now I can only show you a glimpse of what’s in the application so more is to come during next week!

Ergonomidesign_Future_of_Health_Care_no_logo


Also check out the extremely cool custom byte tag with the look of a dragon!

bild

torsdag 29 oktober 2009

ISurfaceScrollInfo and you, Part One.

Before getting into detail about how to implement the ISurfaceScrollInfo, I want to talk about creating a custom panel. But why create a custom panel? Of course there are several ways (as usual) to accomplish a behavior like the page panel, but I think creating a new panel is the best way to take advantage of the WPF framework.

The idea of implementing a custom panel is that we can use it with a ListBox control, SurfaceListBox to be more specific. By implementing a custom panel for a ListBox, we can actually tell the ListBox how we want to layout it’s items.

Now to creating a custom panel. In general, when a panel displays it’s content it does two things: measuring and arranging. First everything in the panel is measured. Measuring is needed to determine the size of the panel and the size depends on one thing: the sizes of the containing items. It is during measuring we have the chance to determine how much space we need to layout the content. In WPF this is the moment when the items desiredSize is set.

After all items are measured, they are arranged. The point of arranging is quite obvious. This is the time when we place each item relatively to each other. Where items are placed depends heavily on their size and that’s why measuring is done before the arrangement. The arrangement is “view independent”, which means you don’t have to think about where you place the items in respect of what is actually viewed to the user. In our case, this is taken care of by SurfaceScrollViewer and that’s the whole point of implementing ISurfaceScrollInfo later on.

To control the measurement and arrangement there are two methods that needs to be overridden in our custom panel:

  • protected override Size MeasureOverride(Size availableSize)
  • protected override Size ArrangeOverride(Size finalSize)

Big surprise huh? As you see MeasueOverride receives a size which describes the available space we have to layout our items. Constrains with other words. Here’s an example: a ListBox which measures 300 times 80 gives an availableSize of 298 times 76. The size returned from the method is the space we want (we may or may not get it). In our implementation only basic measurements are done:

protected override Size MeasureOverride(Size availableSize)
{
var resultSize = new Size(0, 0);

foreach (UIElement child in Children)
{
child.Measure(availableSize);
resultSize.Width = Math.Max(resultSize.Width, child.DesiredSize.Width);
resultSize.Height = Math.Max(resultSize.Height, child.DesiredSize.Height);
, }

resultSize.Width = double.IsPositiveInfinity(availableSize.Width) ? resultSize.Width : availableSize.Width;
resultSize.Height = double.IsPositiveInfinity(availableSize.Height) ? resultSize.Height : availableSize.Height;

return resultSize;
}

It’s important that we call Measure on each child or else we won’t have any desired sizes. We can also see that we tell WPF that we need the same space as given to us to layout our items. (Notice the safety precaution if we get infinite available size. It can happen.)

Now for arranging the items. The argument here is the size that WPF is willing to give us and, as before, it may or may not be equal to the size we wanted earlier. In this implementation all items are placed horizontally. Nothing fancy:

protected override Size ArrangeOverride(Size finalSize)
{
if (Children.Count == 0)
{
return finalSize;
}

var startOffset = 0;
foreach (UIElement child in Children)
{
var destination = new Rect(startOffset, 0.0, child.DesiredSize.Width, child.DesiredSize.Height);
child.Arrange(destination);
startOffset += child.DesiredSize.Width;
}

return finalSize;
}
Here we return the same size as given to us. The documentation only say: “The actual size used.” but I think this is probably important when doing more advanced layouting. In our case returning the same size works fine.

That’s all we need to do for measuring and arranging our items. Next post we will start looking at the ISurfaceScrollInfo interface! Stay tuned.

tisdag 20 oktober 2009

Surface developing in Visual Studio 2010

Today it was time to install Visual Studio 2010 Beta 2 and my hope was to be able to develop Surface Application on the new and sweet Beta 2. Installation of Visual Studio 2010 on a clean Windows 7 was really smooth and easy. The installation was fast and I installed everything except C++ since it is not my mother tongue. Since Team Explorer now is included in Visual Studio 2010 Ultimate that also is a time saver! Not to mention not having to install SP1 on Visual Studio 2008 and .NET Framework 3.5 that takes a lot of time!

After the installation of Visual Studio 2010 I installed the XNA Framework Redistributable 2.0. And then it was time to time for Microsoft Surface SDK 1.0 SP1, Workstation Edition. Now to the first problem. In that installation file there is a startup check that needs to be modified. The check looks for Visual Studio 2008 and that can be handled the same way as I handled installing Surface SDK 1.0 on Windows 7 Beta. So read that post and download the vbs-file since it will be needed!

Drag the SurfaceSDKWE-file and drop it on the vbs-file. This will remove the startup-check for Visual Studio 2008 and will let you install the Surface SDK without having Visual Studio 2008.

After the installation of the Surface SDK is finished you have to copy the templates from \Program Files\Microsoft SDKs\Surface\v1.0\Project Templates\ and \Program Files\Microsoft SDKs\Surface\v1.0\Item Templates and place them in the corresponding folders under \Users\surface.developer\Documents\Visual Studio 2010\Templates\. Just copy the files there and don’t unzip them.

Start Visual Studio 2010, click on New Project and create a new project based on the Surface Application (WPF) that is placed under Visual C#. Make sure to select .NET Framework 3.5 before clicking OK!

When I tried to open the project that I’m working on right now I was hit by the project upgrade wizard that wants to upgrade the solution file from 2008 to 2010. This stops med from start using Visual Studio 2010 until the whole team upgrades. This is really sad since it won’t happen at the moment. So the way Visual Studio handles solution files hinders partial team upgrade.

There still might be things that won’t work when developing Surface applications on Visual Studio 2010 and if you find anything please let me know!

ISurfaceScrollInfo and you, Part Zero.

I’ve been working on this secret project with a colleague of mine, and one part of the project is to create a custom panel for the Surface. So what’s so special about the panel I’m doing? I’m want to replicate the “page panel” found on the iPhone and the Android phones. To clarify, I do not know the official name of the panel but I will call it page panel until someone either tell me the official name or come up with a better name. 

So what is the definition of a page panel? I would say these points would define it:

  • Only one item has focus. Other items might be seen but only one will be focused. I will explain in more detail what focus really mean when the time comes.
  • When the focus moves to another item the panel is animated. Just like the mobile versions (see the youtube-link above).
  • The items are arranged on a straight line, either horizontally or vertically. No wrapping with other words. I will implement horizontal support because that’s what I want, but it shouldn’t be any problem implementing vertical arrangement as well, both from a developers and a user experiences point of view.
  • Changing the item focus are done by the user using finger contacts (or any contact?). I have proposed to trigger focus change contact up, if the contact is out of a certain bound. We’ll get to this later.

A custom panel with custom scrolling, or to be more concrete: inherit from Panel and implement the ISurfaceScrollInfo interface. The guys at the Surface Community recommended me to look at the LoopingPanel, which does exactly that!

I have decided to split my story into several parts, just to make it more exciting and to avoid writing the longest blog post in the history of man. This part is an introduction. The next part will be about implementing a custom Panel, but later on I will tell you about implementing the ISurfaceScrollInfo.

To be continued…

lördag 17 oktober 2009

Multi touch in WPF 4.0 and VS2010

Touch and multitouch is something that has been dear to my heart last year. It all started when Connecta bought a Microsoft Surface table for almost a year ago. Even then, Microsoft talked about the need to work with, and learn multi-touch, and now we see Windows 7 and WPF 4.0 come with native support for multi-touch.

WPF 4.0 has added a number of events to the UIElement that relates to muti touch. The .NET APIs are based on native Win32 APIs that are available only in Windows 7. UIElement is the base class that defines the essence of visual controls for layout, input and events. The events that exist today (Beta 1 of VS2010) are: ManipulationStarted Event,
ManipulationCompleted Event,
Manipulation Delta Event,
ManipulationInertiaStarting Event and ManipulationBoundaryFeedback Event.

By default, a UIElement never recieves events relating to manipulation unless Manipulation Mode is set to a value other than None. With the help of Manipulation mode you can control the type of manipulation you can make on an item. It can for instance be translated in X and/or Y axis, rotate, or scale.

In beta 1 of. NET Framework 4.0 the are events for manipulationare are there but there are not any WPF controls that make use of them. In future versions it will be easy just turn on the touch controls on eg sliders or scrollviewers directly in XAML.

When the ManipulationDelta event is captured in a Window you get a ManipulationDeltaEventArgs. That can be used to find out what changes have occurred on the item manipulated. With the method GetDeltaManipulation you get a System.Windows.Input.Manipulation which contains all of the transformation data that was available when the event occurred. The information can then be used to perform translatation operations on the object. A bit complex, but a piece of code probably makes it easier to understand!

Please note that the ManipulationDelta event will never fire with an ordinary mouse. There must be some kind of touch device. With the help of a project on CodePlex called Multi-Touch Vista you can simulate the use of multiple touch points with normal mouse or a touch pad.

In the XAML-file I add an Image to the Canvas. To that I connect a MatrixTransform so that I can access it from code. I also add an event handler for the ManipulationDelta.

<Window   x:Class="WpfApplication13.Window1" xmlns="http://schemas.microsoft.com/winfx/2006/xaml/presentation"
xmlns:x="http://schemas.microsoft.com/winfx/2006/xaml"
Title="Window1" Height="300" Width="300"
WindowState="Maximized" ManipulationDelta="Window_ManipulationDelta">
<Window.Resources>
<MatrixTransform x:Key="InitialMatrixTransform">
<MatrixTransform.Matrix>
<Matrix OffsetX="200" OffsetY="200"></Matrix>
</MatrixTransform.Matrix>
</MatrixTransform>
</Window.Resources>
<Canvas>
<Image Width="100" Source="/WpfApplication13;component/Images/Sonicspree.jpg" ManipulationMode="All" RenderTransform="{StaticResource InitialMatrixTransform}" ></Image>
</Canvas>
</Window>


In the code behind I use DeltaManipulation to move the image based on input:


private void Window_ManipulationDelta(object sender, ManipulationDeltaEventArgs e)
{
var delta = e.GetDeltaManipulation(this);
var image = e.OriginalSource as Image;
var matrix = ((MatrixTransform)image.RenderTransform).Matrix;
var originalCenter = new Point(image.ActualWidth / 2, image.ActualHeight / 2);

//Translate on the x and y-axis
matrix.Translate(delta.Translation.X, delta.Translation.Y);

//Get the new center point and rotate around that based on the delta
var center = matrix.Transform(originalCenter);
matrix.RotateAt(delta.Rotation, center.X, center.Y);
center = matrix.Transform(originalCenter);

//Scale the matrix based on the delta
matrix.ScaleAt(delta.Scale, delta.Scale, center.X, center.Y);

//Apply the new MatrixTransform
image.RenderTransform = new MatrixTransform(matrix);

e.Handled = true;

}


Note the two red dots representing the two mice I have connected to this computer. The code in this example is based on a video on You Tube that also shows the application in action.


MultiTouchVS2010 


måndag 5 oktober 2009

StartupUri and you.

Let me start with introducing myself. My name is Joakim Rosendahl and I’ve been at Connecta since April first 2009. Became a member of Connecta’s Surface team a month later. I have an academic background in Computer Science and I’ve mostly been working with WinForms and WPF since 2007.

Enough about me, because I’m going to talk about something that happened to me in my latest Surface project. I had the ambition to implement a surface project using the M-V-VM design pattern. I took the naive approach and removed the StartupUri statement in App.xaml and added code below in the code-behind.

protected override void OnStartup(StartupEventArgs e)
{
base.OnStartup(e);

var demoViewModel = new DemoViewModel();
var demoView = new DemoView
{
DataContext = demoViewModel
};

MainWindow = demoView;
MainWindow.Show();
}

The idea is to hook up the view model (DemoViewModel) before showing the main view (DemoView.xaml) which is a SurfaceWindow. This worked fine until I hooked up to the Surface Shell on our surface board. Somehow, when I start the application in the Surface Shell the Shell is on top of my application. When I alt-tab I can see my application running in the background. For some reason my main view doesn’t get incorporated into the Shell as it should do.

Anyway, I made a workaround, restored the StartupUri property to “DemoView.xaml” and added some non-M-V-MV code. I’ve posted this problem on the Surface Community for a couple of weeks ago. The Surface support has contacted me on email to this matter. But a simple solution would to not make the main SurfaceWindow to a View (as according to the M-V-VM design pattern) but instead to something like the sample code that Dan Cravier posted on his blog ages ago. I will still update when I get a proper solution from the Surface Support.

onsdag 23 september 2009

Nice PoS application in Germany

I just found a video of a retail, position of sales, Surface application in Germany. It looks like it is at the telephone company O2 made by Syzygy. When will we see the first publicly available Surface application in Sweden?

tisdag 15 september 2009

360 degree UI – always a good thing?

Since Microsoft Surface has the form of a table it offers a unique way of social interaction around a computer. Users can sit around the table and participate on equal terms. To be able to achieve this, the designers and developers must focus very hard on creating a user interface and a user experience that supports 360 degree user interface. This, I would say, is one of the biggest challenges for a team building successful applications for Microsoft Surface and something that we always focus on early in the design process.

Yesterday I attended a Surface workshop were we planned an application that might have an advisor-client user profile. With that I mean one professional sitting on one side of the table and the client(s) sitting on the other side. It could be in a bank with an employee and a client or at health facility with a physician and a patient. Based on our previous experiences we still focused on a 360 degree user interface but in that context, is that really necessary? Couldn’t it be okay to have the user interface mainly focus the unfrequent users, i.e. the client or patient?

I think so! And today I saw a video of a banking application that does exactly that. Take a look at Hawanedo Surface from Figlo. They have created an application for the financial industry to offer financial advice on Microsoft Surface. The user interface is entirely facing the two clients at the bank and I believe that is great in that context. If you were to build an application like that with 360 degree user interface chances are that you would end up with a worse outcome.

So when designing application for Microsoft Surface, think about the physical context of where the application will exist and how your users will be placed around the table when they interact with it. Also don’t just create individual personas but also groups of personas and design the application for them.

Hopefully I will be able to tell you more about the application that we are planning in the near future.


onsdag 9 september 2009

Share your Surface experience

A good sign for a growing developer community is when new tools pop up and experiences are shared in the open. Lately more and more developers have gotten in touch with Microsoft Surface, and it has resulted in several code projects on Codeplex. I want to digitally high five the teams for sharing their work with us. In my opinion the fastest way to a mature developer community is through sharing knowledge and experience, which is exactly what the Surface and NUI community needs.

A quite usuful project web is the Surface Academy 2009 Toolkit. On the project web the Microsoft Surface Academy has put up a couple of controls and a card game starter kit. Thank you, guys!

måndag 7 september 2009

Alive again

When I wrote my last blogpost about Surface our unit was dead. That was before the summer but now we are back on track again. The unit got replaced by Microsoft and our new SP1-unit is now up and running again at Connectas head quarters in Stockholm. There is still some work to do to get every application installed again but most of the work has already been done by a colleague of mine. Last week I conducted a demo for a group of people at a large Swedish company which was really fun. I think it sparked many thoughts among the participants. Before the demo I Connecta-branded the Music and Photos app and did the final install of Sonicspree.

Regarding Sonicspree there has been some development over the summer. Some of the work was regarding bug fixes but most importantly, virtual dice! So now the application can be started without the fantastic dice that Ergonomidesign created for Sonicspree to From Business to Buttons. This facilitates a lot because it has previously been a bit sensitive to where we store the dice.


This fall we will have two more or less public appearances with Surface. The first is at Microsoft Parter Summit on the first of October at Kistamässan in Kista, Stockholm, Sweden. We will be there with our Surface to show Sonicspree to the masses and where we also will attend .NET Awards. I hope that every reader will take a minute to place a vote for us here. Seriously, it takes less than a minute!

The other event we will attend is Sign Scandinavia in November but more information on that later.

Internally we have been working on a demo together with SAP on Surface. I personally haven’t been involved in the development of the application but there is some form of SAP/Connecta-event on Wednesday so I think the project should be done really soon.

This was just a short update to let you all know that we don’t have a dead Surface anymore but one that is alive and kicking.

torsdag 25 juni 2009

Our Surface is dead!

On the last day of the Malmö conference our Surface unit broke down! After shipping it from Stockholm to Malmö (about 600 km/370 miles) everything worked perfect on the press viewing and on the first day of the conference. But on the second day it didn’t boot!

You can hear the fan start and all the status lights indicate normal running mode but nothing happens on the screen. We checked the project lamp, plugged out BlueTooth usb, plugged in an external monitor but nothing changed. It was dead!

Last week I got in contact with a Surface Escalation Engineer that tried to help me get access to the registry. There is one setting that says what x-coordinate the display starts at and that might get corrupted if you unplug an external monitor the wrong way. I have seen it happen with the Surface Shell not showing up on the table but never during boot. I think it is a very strange solution that the bios checks the registry for this value. It feels like the table should always boot with the table as main display.

Anyway, it was impossible to get access to anything on the unit. The I/O panel is completely dead. I don’t get an IP-address and there is no response when I plug in an usb mouse or keyboard. And since I will void the warranty if I try to open the unit and since there are no Surface technicians in Sweden a complete exchange is the only way to solve this issue.

Microsoft has been really helpful with my case, both from Microsoft Sweden and thru the Surface Community. But I still think it is remarkable that they sell a piece of hardware for +10.000€ with no technicians in the country!

By the way, I just got the exchange confirmation and the new table will arrive next week. The good thing is that now it is delivered with SP1. The bad thing is that I’m having hours after hours of installing and configuration to get the unit back to where it was when it broke!

Sonicspree video

Our friends at Ergonomidesign have created a short video of Sonicspree.

torsdag 18 juni 2009

Sonicspree


During the last weeks I and some other people from Connecta have been involved in a project together with Ergonomidesign. Our goal was to build something to showcase on the conference From Business to Buttons that took place last week in Malmö, Sweden. Our case was to build an application that could exist in a retail telecom store, attracting customers to the store and making them stay longer.

Our application, Sonicspree, contains of two sides. On side is called the Store Mode and the other is called the Quiz Mode and both have a clear music focus. The part that we have developed so far is he music quiz.

While creating Sonicspree we have stayed true to some really important fundamentals of design for Microsoft Surface and that is 360 degrees UI, interaction with physical objects and multi user.

The game can be played by up to six people at the same time, spread around the table. Each player has a player area where the player score is kept. The game starts when someone rolls two dice to decide genres for the music in the quiz. When the dice are removed album covers start floating around the screen with the back side facing up and a song from one of the two genres starts playing. Each user starts dragging covers to the center of the table where the front side is revealed. When a user finds the matching cover to the song that is playing she drags that cover to her player area.

The dice and the flip-flop that is used to change from quiz mode to store mode are custom made by Ergonomidesign.


Quiz mode


Store mode


Custom made dice


Playing the game


onsdag 10 juni 2009

Table on tour again

In the beginning of May I wrote a blog post about the coolest project in Sweden. Since then Connecta and Ergonomidesing have been working really hard to finish an application to From Business to Buttons starting in Malmö tomorrow. I have to say that I’m really happy with the result and looking forward to show it to a crowd that probably will be a critical one since the main focus for the conference is user experience. But confident as I am – that will be no problem! The UIX-people on our team has done a great job!

The application that we have built is a music game and I will get back with more details on that after the conference.

The table was supposed to get picked up by DHL yesterday but they failed big time. Apparently some delivery guy from DHL went to Connecta yesterday, didn’t find the table, and then went home. I suppose that he had a bad day and I can’t blame him but he certainly ruined my morning. A phone call at 8.30 from my colleague Marcus: “The table is still here as Connecta, is that a problem?” Panic, stress and gastric ulcer!

DHL says that they are responsible but that they don’t have a car available to drive the table to Malmö. The clock is ticking. A lot of time and money invested in this project. On site set up and deployment today in Malmö and the conference starting tomorrow. What to do?

Urban Falck to the rescue!

A new phone call, this time from another colleague; Urban Falck. Urban is a guy that doesn’t see many problems or obstacles. His solution was: I’ll take the 125 kilo pallet with the Surface table in my tiny car and drive down to Malmö! Hey, it’s only 600 km!


So, the table is in a car and on its way with Urban. Marcus is on site and responsible for the bits and the dice (more on that later) and I’m still in Stockholm. Tomorrow is last day in Pre School for my oldest daughter and then departure to Malmö.

Hope to see you at From Business to Buttons on Friday!

tisdag 12 maj 2009

Surface SDK SP1

Wow! The new visual stuff in SP1 looks really really good!

  • An update to the application Water has finally removed the little light in the middle of the pond. Many users tried to touch the light and was expecting for something to happen. Now Water makes a sound when touching and upon first touch the menu assessors in the corners appears. I think this is a really good thing since many users had problems knowing what to do with Water.

  • One of the things from the design guidelines that many applications don’t follow is that you should always get feedback from touching the surface. Even if nothing is expected to happen you should get feedback so that you don’t think something is wrong. I have solved it in some applications by using pixel shaders but it is a lot of work behind it. Now it is added to the core functionality of the table. So now, every time you place your finger on the surface you will get feedback. The feedback consists of a little blur effect and a small trail behind your finger as you move it.

  • Another thing that confuses a lot of users is resizing. Some controls can’t be resized and some can only be resized to a particular size. Now, in SP1, when you try to resize a control to a size larger than maximum size you will get small rubber bands between your fingers and the control. So you can clearly see that there is a limitation to the size of the control.

  • A new menu control that I haven’t played with yet called the Element Menu is now available. This adds a menu on top of an element that works kind of like a context menu for an element. It looks really useful so I’m looking forward to play with that.

Apart from the visual stuff, which there’s more than the once mentioned here, we also get support for Windows Update and some nice tools to support management and testing. The testing tool “Surface Stress” looks cool. It is a command line tool that lets you run a lot of users at the same time just bashing the table. Fingers, blobs and tagged objects flying around trying to mess up your application. Hopefully this will help you find bugs in a lab environment before going into production.

Now we also get an Identity Tag Printing Tool. This can, not surprisingly, be used to print identity tags for Surface.

The Microsoft Surface SDK 1.0 SP1, Workstation Edition is now almost double in size compared to the 1.0 version. It has gone from 73 MB to 143 MB. Unfortunately you can’t run both 1.0 and 1.0 SP1 side by side. The setup wizard will detect if you have version 1.0 installed and will upgrade.

I also see support for Windows 7 since it isn’t necessary for my little tweak to bypass the OS-version check.

I will be getting back on this topic as I find more interesting stuff!

fredag 8 maj 2009

The coolest project in Sweden!

Finally it’s settled, we are going to the conference From Business to Buttons in Malmö, Sweden with our Surface-table. It will be placed in the exhibition area together with Ergonomidesign. Now we are about to start to develop an application together with a clear goal in mind – It will run on the table in Malmö in exactly one month later!

The project kicks off on Monday and the project group consists of a nice mix of designers and developers. Connecta will line up some really cool and extremely talented Surface developers and architects and from Ergonomidesign there will be a couple of wizards in User Experience Design and User Interface Design. This will be a great opportunity to try a real Designer/Developer Workflow!

Of course we will be using Visual Studio on the developer side and all the resources from the designers will be done in xaml using all sorts of tools and of course Expression Blend.

In Blend 3 Microsoft has finally added the ability to work integrated with source control so we will be using Team Foundation Server for Application Lifecycle Management. The only caveat is that you have to add the project to source control using Visual Studio and you have to bring the solution to the client using Visual Studio of team foundation command line tools. But once that is done Blend will light up the user interface and give the ability to work with source control from context menus in the Project pane.

The designers will be using SketchFlow in Belnd 3 to create the user experience design and I’m really looking forward to see the results from that. Even if it won’t work 100% with the Surface Simulator we could always build the first user experience prototype as a normal WPF client.

Earlier this week we had a telephone conference with Mr Surface, Dr Niel Roodyn, from Sydney Australia. We were supposed to use Skype but I hadn’t tried using it with Windows 7 so I couldn’t get the microphone to work – my bad. Dr Neil will be our moral support during the project and will hopefully come with some interesting insights during the progress of the project. First of all we will shot some ideas on him to get help in finding the right path to success. Now I’m using Windows 7 RC and hopefully Skype will work better next time. Otherwise we will have to start paying for the loooong distance calls to Australia.

So, now if someone is really jealous that Connecta and Ergonomidesign have the coolest project in Sweden right now, I can only say that I totally understand you!


tisdag 14 april 2009

Surface on tour

Today our Elvis has left the building! I just got an email with a proof of delivery that the messenger service has picked up our Surface table and is expected to deliver it to the Sheraton hotel in Stockholm later tonight. Tomorrow is the first day of Cornerstones conference Developer Summit and Connecta will be in the exhibition together with Microsoft and our Surface table. To this event three of our developers have worked really hard to finish a first version of an application used to present Connecta. I have been promised the final bits on email later today!

On the table we also have the latest applications from Microsoft, including the three games released last week and the Mobile Connect Sample Application. The later not yet installed but based on the previous installation experiences, it should be no problem. The four games are Chess, Checkers, Tiles and Ribbons.

The Microsoft Surface Mobile Connect sample application connects a Bluetooth-enabled mobile phone to a Microsoft Surface unit to enable users to interact with data and contacts on their phone. To be able to use the application you have to have an application installed on your phone and you have to have a Bluetooth stack from Microsoft.

So if you are at Developer Summit 2009, come by the Microsoft booth, say hi and touch the Surface!

onsdag 1 april 2009

iBar from Mindstrom

Today I tried the iBar from Mindstrom. They say that it is the first commercially available multi-touch, interactive, customisable bar in the world and, as far as I know has similar setup as Microsoft Surface. The form factor is different and that’s what makes the product really interesting but Surface seems way ahead when it comes to the technology side. Microsoft Surface feels more robust and has better 360-degree capabilities. In the demos I saw and tried there was no notion of orientation on the things placed on the bar.

The iBar is about four feet (120 cm) high and maybe seven feet (210 cm) wide but you can connect several iBars together.

We have talked about building some sort of podium for our Surface to be able to work at it standing. Today’s demo of the iBar convinced me even more. It is really hard to sit at a Surface-table for a longer period of time since you don’t really have a comfortable way of sitting around it. There is no where to place your legs.

I’m really looking forward to see what other form factors Microsoft are planning for coming versions of Surface!

måndag 16 mars 2009

The table is here!

Finally the table is in our hands. It was some time ago that the table arrived but I haven’t had time to write anything about it so far. The table was delivered by UPS and they deliver thru the first door of the house. After that it is you own responsibility to move it to the desired location. There is a Site Readiness Guide and I really recommend reading it carefully, specially the parts about Surface Dimensions and Weight. The shipping crate that the unit comes in is huge! I had just assumed that it would arrive on a pallet of standard size but the pallet was wider and didn’t go thru the door. So I had to unpack the Surface unit outside our office and carry it with bare hands. Well not alone since the table weights almost 90 kg.


Our setup consists of a wall mounted flat screen monitor as a primary display and a Logitech DiNovo Edge Bluetooth keyboard with integrated touchpad for input. I have also set up Live Mesh to simplify deployment of applications that don’t need an installer but more on that on another post.


Setting up the table was really easy thanks to the great video on the community site where Greg Swanson and David Nichols unpacks and installs a unit. The video can be found under Training Videos in the downloads-section and is named “Installing a Surface Unit”. When you have placed an order, make sure to ask for access to the Surface community via the Surface Business Desk!
At first I was struggling a bit to be able to set up the primary and secondary monitors correctly. I tried to use my normal plug-in-an-external-monitor-to-Windows-Vista-skills but didn’t realize that there is a shortcut to an application to set up the monitors on the desktop. With that in hand the set up was really easy.


After setting up the monitors, the administrators account, installing antivirus and hooking the unit to our domain it was time to start the Surface Shell. Excited to try our own unit for the first time I forgot to start Surface Input with the result that nothing happened when interacting with the Surface. Then I remembered Dr. Neil saying “There is nothing wrong with the table. Just start Surface Input first.” Surface Input is started by a shortcut on the desktop and starts an application that activates the cameras and makes the unit ready for input.


The last two days the unit has been placed in the reception during some events that we have had with customers and the response is massive. People love it! One thing that I have noticed is that it is really interesting to observe new users from a distance. See what they do and how they try to interact with the applications. A lot try to double click and if they don’t receive feedback on interaction right away they start to touch all over the place. One of our developers has built an application that reads image libraries from our Intranet based on SharePoint. It uses the classic folder metaphor and when a user sees a folder they have to double click! But in this application one click on a folder loads the pictures and the next click on the same folder hides the pictures. So by observing users you can learn a lot! This is of course nothing new but became really obvious when they are not only interacting with a new application but also with a new type of interface.


Now the unit is going back to the developer cave again and that feels good. It is impossible to sit in a public area and develop and test applications.

onsdag 25 februari 2009

Interviewed on MSDN Radio.

I have been interviewed on Swedish MSDN Radio! Last week Dag König, who is a Product Technology Specialist at Microsoft Sweden, talked to me about out Surface in general, Surface development and out plans with Surface at Connecta. The interview is in Swedish and is entitled “We put all the cards on the table with Microsoft Surface.” The show is over an hour and the Surface-stuff starts at about 27 minutes into the show and last for 20 minutes.

The interview

Surface training


When me and Jouni were at the Surface training in Munich Jouni wrote an application that uses the raw images from the cameras. The table consists of five cameras, four cameras that take pictures of the corners and one that takes a picture in the center. Then there is a process that goes from the raw images to a binary version of the image with each pixel either black or white for faster processing. The screen is divided into a grid containing one-inch squares. The next step is to place each frames contact data into shared memory and tell the SDK that data is available and ready to use.

The fact that cameras are used and not just a touch screen is what makes Microsoft Surface so special. Things that happen on the surface are recognized and even things that happen above the surface are noticed. About one inch above things starts to happen.

The course that we attended took place at one of Microsoft’s Technology Centers (MTC). There are three MTC in Europe, Dublin, Paris and Munich. On these centers Microsoft have three types of offerings, Strategy Briefing, Architecture Design Session and Proof of Concept Workshop. The center was really great even if the lunch was a logistical challenge. You can read more about the centers here: http://www.microsoft.com/mtc/default.mspx

I had to try Jounis application and the quality of the images that you get from the cameras with my face. "Thank god they can be cleaned was Dr Niels diagnosis."


The resulting image

Jouni in action

måndag 23 februari 2009

Love at first sight (at least attraction)

A very important new concept with Microsoft Surface is "Attract applications". These types of applications are screen-saver like, and are designed to entice people to the table. A good (and by all means fun) attract application should welcome people to touch and use the Surface table.

Water
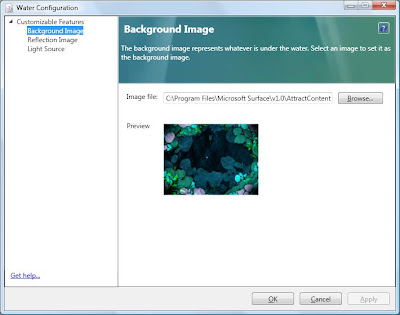
The standard attract application that is shipped with Surface is called “Water”. Water might seem a a bit laggy when it’s run through the simulator, but on the table itself it’s beautiful and runs smoothly. The Water application can be customized a tad by using the Water configuration tool that comes with the Surface SDK.


Water Configuration Tool

Custom attract applications
It's pretty challenging to create your own attract applications with the Microsoft Surface Interaction Design Guidelines in mind. However, if you go for it strive for an application with very high interactivity and 360 degrees usability. You have to be able to entice people from all sides of the table - and keeping them there. To create a custom attract application, follow these steps:

1. Develop a Surface application.
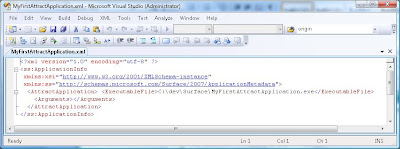
2. Modify the application’s description file. (This XML file most likely has the same title as your project, at least if you’ve created the project by using the Visual Studio templates that comes with the Surface SDK). Change the file to look something like this:


Description file for an attract application. (Note: “ExcecutableFile” is the path to your build Surface application).

Another option is to just comment out the "application" section in the description XML file and un-comment the "attractapplication" section.

3. Deploy the XML file to "%ProgramData%\Microsoft\Surface\Programs". %ProgramData% is a pre-defined path.
4. The next step involves creating a registry key, so if you’re not familiar with handling the Windows registry make sure you create a back-up of the registry before moving on.
5. Add the following registry key "HKEY_LOCAL_MACHINE\SOFTWARE\Microsoft\Surface\v1.0\AttractMode"
6. Create a new String value to the key AttractMode (from step 5), and call it "CurrentAttractApplication". Set the value to your new attract application’s xml file name, without the file extension. I.e. the above “MyFirstAttractApplication.exe” would be the value “MyFirstAttractApplication”.

When you restart the Surface shell or Surface simulator your new attract application should load right way. Don’t worry if it doesn’t. If the registry key points to the wrong file, or you're having any other hard-to-guess error, the default application is loaded (normally “Water”).

Note: The Surface SDK tells you to “Open the registry and navigate to the HKEY_LOCAL_MACHINE\SOFTWARE\Microsoft\Surface\v1.0\ModeProfiles\Xxxx\AttractMode key (where Xxxx is the appropriate mode profile).” I can't get this to work, and also Dr. Neil talked about this at the Surface training I attended. Below you got an example of the suggested SDK (wrong) way, and one that works.


Doesn't work


Works